Create a Table of Contents in Word 2011 for Mac
Creating a Table of Contents, or TOC, for a document in Microsoft Word 2011 for Mac is not difficult, but it can be tricky to make it look just like you want it. This lesson takes you through the process of creating a dynamic table of contents that can be easily updated to reflect the content in your document.
Overview
There are several steps involved in creating a table of contents from Microsoft Word 2011 for Mac OS:
- Create a document using document styles to identify your headings.
- Insert a table of contents.
- Update your table of contents as the content of your document changes.
Create your document using heading styles
Heading or Document Styles are used in Word to format a document in a consistent way that is easy to change. Styles are particularly useful when creating a long, well structured document. In this lesson we'll cover how to use Styles but not how to create, edit or manage them.
Using Styles in Microsoft Word is easy thanks to the Quick Styles gallery, which is found in the Home toolbar:

To apply a style, simply select the text to which you want to apply a style, and then click the appropriate style in the Quick Styles Gallery. By default, Microsoft Word builds a table of content using any text that has Heading 1, Heading 2 or Heading 3 applied to it, so those are the styles you should use if you are planning to create a table of contents for your document.
Here's an example of a document that we will format using Word's built-in styles: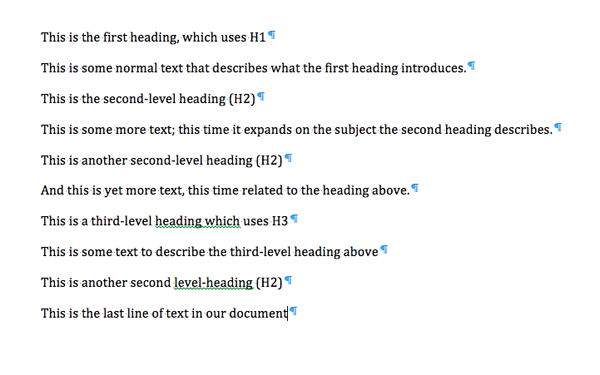
Here's the same document after it has been formatted using styles - Heading 1, Heading 2, Heading 3, and Normal (which we'll use for any "normal" text that isn't a heading):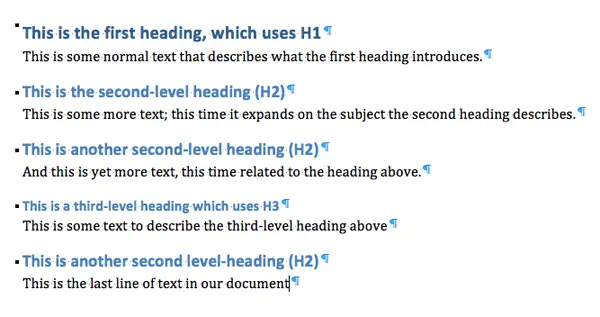
Now that we have a document that contains content formatted using Word's styles, we can create our Table of Contents.
Insert and Format a Table of Contents
To insert a table of contents into your document, follow these steps:
- Select the position in the document where you want the table of contents by clicking in the point of the document where the table of contents should be inserted.
- Choose the Document Elements ribbon toolbar. This has a list of buttons that let you insert a table of contents using different presentation formats:

- Each button will insert a table of contents; the differences between the buttons is the format that will be applied to the table of contents. Key differences you will notice between the options above include:
- Whether level 2 (Heading 2) and level 3 (Heading 3) styles should be indented or left aligned.
- Whether the text should be presented in Sentence Case (the first word is capitalized, the rest are not) or Uppercase (where all words are in capitals).
- Whether there should be any underlining or leading.
- Any other formatting that might be needed in the table of contents. Note that the table of contents itself using document styles. This means that you choose one of the options above and then customize the document styles to change how your table of contents is presented.
- The following example shows our document using the fourth option shown above. As you'll see, the title, Table of Contents has been inserted automatically. Each of the heading lines from the document example above have been used to create the table of contents.
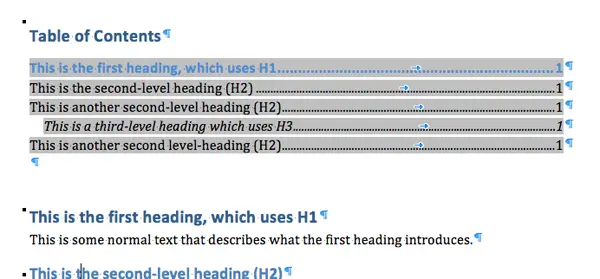
- Notice in the example above that the table of contents has been inserted on the same page as the text used to create it. It's likely you will want to put the TOC on a separate page. You can do this using a page break.
Update your table of contents to reflect changes in your document
- Once you use a page break to separate the TOC onto a separate page to the content it relates to, you need to update the table of contents to reflect the changes to the page numbering that have taken place.
- There is an Update button on the Document Elements toolbar:

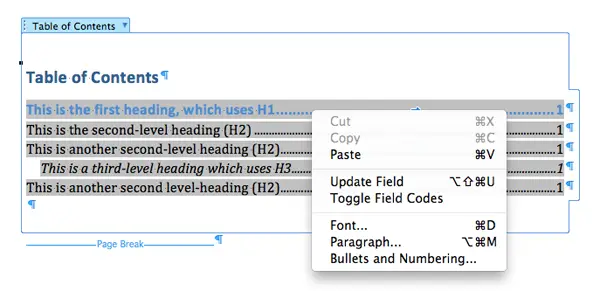
- You can also right-click (Option-click on a Mac) to view the context menu, from which you can choose the Update Field option (note the page break in the example as well):
- There is an Update button on the Document Elements toolbar:
- Whichever option you choose, the following dialog box will appear:
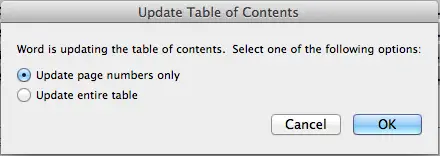
- In most cases you can choose Update entire table. This will update the page numbers and add any new headings that should be included in the table of contents. The option to Update pages numbers only will ignore any changes you have made to the document.
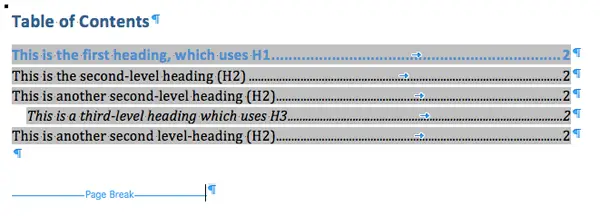
- Here's how our document looks now, having inserted a page break and then updated the table of contents:
Join our mailing list
Our Comment Policy.
We welcome your comments and questions about this lesson. We don't welcome spam. Our readers get a lot of value out of the comments and answers on our lessons and spam hurts that experience. Our spam filter is pretty good at stopping bots from posting spam, and our admins are quick to delete spam that does get through. We know that bots don't read messages like this, but there are people out there who manually post spam. I repeat - we delete all spam, and if we see repeated posts from a given IP address, we'll block the IP address. So don't waste your time, or ours. One other point to note - if you post a link in your comment, it will automatically be deleted.
Add comment